
Displaying Weather on the Desktop with ConkyForecast
For a lightweight system monitor, Conky can display an awful lot of useful information. But besides the usual stuff like RAM usage, processor load, and wireless signal strength, you can use Conky to display something more interesting like the current weather conditions and a four-day forecast complete with snazzy weather icons. Usually, though, this would require a lot of manual tweaking, but the ConkyForecast package makes the process of turning Conky into a desktop weather station rather straightforward on any Ubuntu-based system.
First off, you have to install the Conky Forecast. To do this, open the sources.list file for editing using the gksudo gedit /etc/apt/sources.list command. Add then the following line at the end of the file:
deb http://ppa.launchpad.net/m-buck/ubuntu intrepid main
Open the terminal and run the command below to install ConkyForecast:
sudo apt-get update && sudo apt-get install conkyforecast
Next, you have to obtain a Partner ID and a License Key from the The Weather Channel which is required for accessing weather data. Once you have done that, use the command below to copy the .conkyForecast.config file to your home directory:
cp /usr/share/conkyforecast/conkyForecast.config ~/.conkyForecast.config
Open then the copied file for editing using the nano ~/.conkyForecast.config command and enter the obtained Partner ID and License Key as follows:
XOAP_PARTNER_ID = Your Partner ID XOAP_LICENCE_KEY = Your License Key
Next step is to find out the Location ID of the city you want. To do this, use the http://xoap.weather.com/search/search?where= url followed by the name of the city, for example:
http://xoap.weather.com/search/search?where=BERLIN
Copy the Location ID (in this case, it’s GMXX0007), and open a sample Conky configuration file for editing:
sudo nano /usr/share/conkyforecast/example/conkyrc
Replace the default Location ID with your own, save the file, and launch Conky by pointing it to the sample configuration file:
conky -c /usr/share/conkyforecast/example/conkyrc &
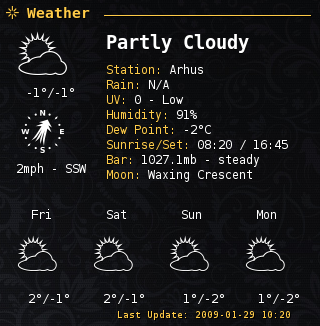
You should see a Conky window with a nice-looking weather forecast.


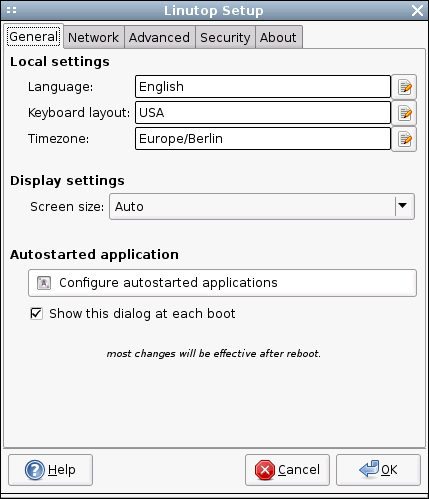 The Linutop Setup applet’s window is divided into four main sections: General, Network, Advanced, and Security. Besides the Language, Keyboard, and Time zone settings, you can use the General section to configure display settings. Usually, Linutop does a good job of detecting the correct display size and resolution. But if it has problems detecting the display’s properties correctly, you can select the appropriate item from the Display size drop-down list. The General section also allows you to configure autostart options, which can be useful in many situations. For example, you can configure Linutop to bypass the full graphical desktop environment and launch only a specified URL in the default Web browser. This can come in particularly handy if you want to use Linutop as a simple Web station. To do this, press the Configure autostarted applications button, select Web Page from the Select an item drop-down list, and tick the Start only this application check button. Tick then the Start with this URL or file check box and enter the desired URL.
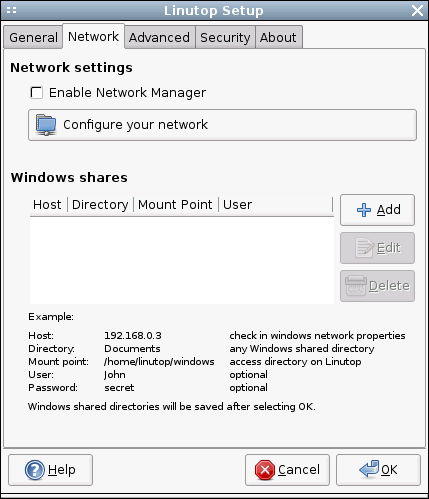 As you might have guessed, the Network section lets you configure wireless and wired interfaces as well as a modem connection. If you are using the built-in Ethernet connection, Linutop does all the donkey work for you. However, if you still need to tweak some settings (e.g., define a static IP address instead of the default DHCP option), press the Configure your network button, select Ethernet connection, and press Properties. In a similar manner, you can configure a wireless interface. Choose Wireless Connection from the list of available connections, press Properties, and fill out the required fields. If you are using Linutop in a mixed environment and you want to access documents and files stored on a Windows machine, you can use the Windows shares subsection to easily add shared folders. Simply press the Add button and type the IP address of the Windows machine in the Host field. Enter then the user name and password required for accessing the Windows share and press OK.
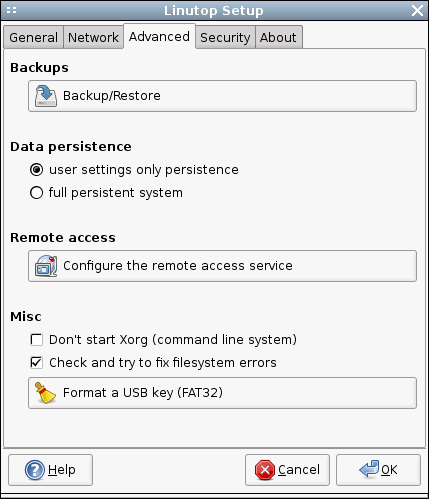 The Advanced section sports a couple of rather useful features. As the name suggests, the Backup/Restore button allows you to back up and restore the entire system in just three simple steps: press the button, select the destination drive, and press the Apply button. When you shut down Linutop it by default saves only the user settings. So if you install an application and then reboot Linutop, the system will return to its original state. This may sound like a nuisance , but this feature can be useful in situations where you don’t want other users to mess with the system. But what if you want to install additional applications? Select the full persistent system option in the Data persistence subsection, and Linutop will from now on save all your settings and applications. The Remote access subsection lets you easily enable and configure the remote access service, so you can connect to your Linutop and control it from another machine on the network or via the Internet. Press the Configure the remote access service button, and tick the Automatically start the server check box, so that the service starts automatically when you turn Linutop on. If you want to protect Linutop from unauthorized access (which is a very good idea), tick the Request a password check box and specify the desired password. To let users view the Linutop desktop but not control it, tick the Connected users can only view the desktop check box. Finally, tick the Allow multiple connections check box if you want to allow more than one user to access Linutop. Press the Start button, and you can then access Linutop remotely. You can use Linutop not only as a desktop machine, but also as a server. Install, for example, Samba software on it, plug in an external USB hard disk, and you can use Linutop as a nifty file server. In this case, Linutop doesn’t need the full graphical desktop environment, and you can disable it by ticking the Don’t start Xorg check box in the Misc subsection.
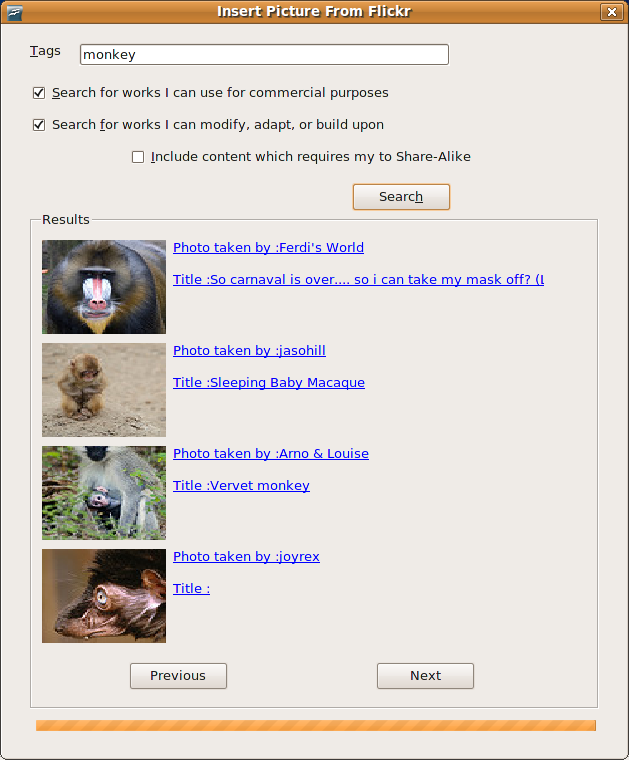 Once installed, the extension adds the Insert -> Picture -> From Flickr command which you can use to evoke the Insert Picture From Flickr dialog window. Enter the search terms you want in the Tags field. If necessary, tick the appropriate check boxes to specify additional usage requirements. Hit then the Search button to perform the search. This returns a list of photos matching the specified criteria, complete with thumbnails and hyperlinked titles and descriptions. You can use the Previous and Next buttons to browse through the list. When you’ve found the photo you like, right-click on its thumbnail to insert it in the current document and choose the desired size.