Setup Firefox or any other starting
applications. The kiosk can be locked
with a password so the initial state is always recovered at each
restart, Linutop provides a simple and ready-to-use public Internet access.
For Office desktop:
With Firefox and Open Office stored on an internal flash memory = no
alteration possible by mishap or virus.
For Display or Monitoring:
VLC media player, no moving parts and small size = a very easy and extremely
reliable solution for a web signage and narrowcasting.
It also has a serial port for industrial applications (More…)
Bosch, an international technology company, came to us with the need for a display solution in a factory in Eastern Europe. To optimize production, Bosch wanted to display the state of each production line so that their workers can anticipate and detect any interruption or abnormality. Their requirements were maximum reliability, even in the case of a power outage, and minimal power consumption.
After evaluating a number of options, Bosch chose to implement Linutop 2 with its mounting brackets, discretely mounted on the back of VGA monitors. Linutop Operating System was configured with a small script that displayed an HTML web page from the company’s production server. This allowed anyone on the factory floor to monitor the production line with a quick glimpse, decreasing production downtime while using minimal energy.
In addition to meeting Bosch’s original requirements, Linutop’s secure operating system that can be set to a read-only mode and have the fall-back of its reboot feature gave Bosch the peace of mind that it was looking for. Finally, Linutop’s light operating system that can be saved on a USB key made it easy for Bosch to replicate the same configuration on numerous PCs throughout its factory and backup simultaneously.
Tristan Nitot (Mozilla Europe) was one of our fist support of the Linutop project. Mochilas Kanken Barcelona The video was taken in Solutions Linux 2007 …
10 months after the start of the Linutop project we decided to present the Linutop 1 on solution Linux en february 2007. Frederic Baille, co-founder of the Linutop company, presents the first product.
Gauvain Pocentek is one of the key person in the success of the Linutop. He is in charge of the Linutop software based on Xubuntu. The video was taken in Paris February 2007 at our first meeting.
While Linutop is not designed to run heavyweight applications, you can relegate the most demanding computer tasks to a more powerful desktop machine or server and use Linutop to run applications remotely. This solution (often called the server/thin client model) allows you not only to use demanding applications on your Linutop, but also lets you access files and documents stored on a remote machine. This means, for example, that you can easily access documents and applications on your computer at the office using Linutop at home. air max pas cher To do all that, you have to install and configure a VNC server on your desktop computer, and set up a VNC client on your Linutop. VNC is a protocol that allows you to control a remote computer as if you were sitting in front of it. And if you run a VNC session in full screen on your Linutop, it’s almost impossible to tell that you are controlling a remote machine. VNC is not the fastest system of its kind, but it is very easy to configure and straightforward in use. And if you run it on your home network, it is fast enough for most tasks. Read the rest of this entry »
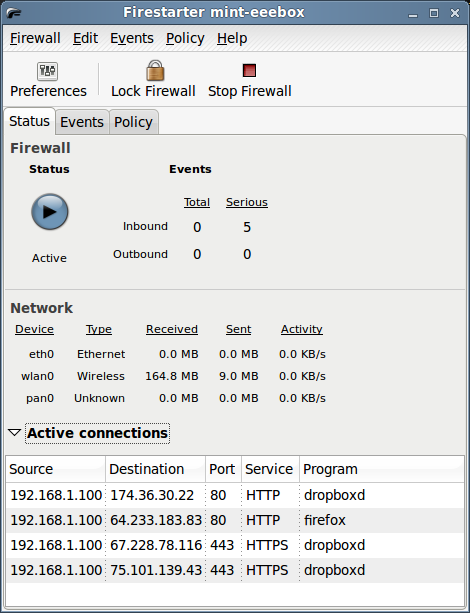
Even the most basic routers these days offer the NAT feature and firewall capabilities which protect your machines on the local network. But there are situations when you have to connect your Linutop directly to the Internet, or bypass the router’s firewall (for example, if you want to use Linutop as a server accessible from the outside). In this case, a decent firewall tool is essential. The problem is, though, that many firewall applications are not particularly user-friendly and you really have to know what you are doing when configuring them.
If tweaking a firewall via the command line is not your cup of tea, then you’ll appreciate Firestarter, a graphical application which significantly simplifies the process of setting up and configuring a firewall. To install Firestarter, run the sudo apt-get install firestarter command, or use the Synaptic package manager.
Just because Linutop is based on Linux, it doesn’t mean it’s difficult to configure. In fact, the little machine comes with a custom Linutop Setup applet which allows you to configure virtually every aspect of the system in a matter of minutes. By default, the applet starts automatically, but you can also launch it manually at any time by choosing Applications -> Setup -> Linutop Setup. The Linutop Setup applet’s window is divided into four main sections: General, Network, Advanced, and Security. Besides the Language, Keyboard, and Time zone settings, you can use the General section to configure display settings. Usually, Linutop does a good job of detecting the correct display size and resolution. But if it has problems detecting the display’s properties correctly, you can select the appropriate item from the Display size drop-down list. The General section also allows you to configure autostart options, which can be useful in many situations. For example, you can configure Linutop to bypass the full graphical desktop environment and launch only a specified URL in the default Web browser. This can come in particularly handy if you want to use Linutop as a simple Web station. To do this, press the Configure autostarted applications button, select Web Page from the Select an item drop-down list, and tick the Start only this application check button. Tick then the Start with this URL or file check box and enter the desired URL. As you might have guessed, the Network section lets you configure wireless and wired interfaces as well as a modem connection. If you are using the built-in Ethernet connection, Linutop does all the donkey work for you. However, if you still need to tweak some settings (e.g., define a static IP address instead of the default DHCP option), press the Configure your network button, select Ethernet connection, and press Properties. In a similar manner, you can configure a wireless interface. Choose Wireless Connection from the list of available connections, press Properties, and fill out the required fields. If you are using Linutop in a mixed environment and you want to access documents and files stored on a Windows machine, you can use the Windows shares subsection to easily add shared folders. Simply press the Add button and type the IP address of the Windows machine in the Host field. Enter then the user name and password required for accessing the Windows share and press OK. The Advanced section sports a couple of rather useful features. As the name suggests, the Backup/Restore button allows you to back up and restore the entire system in just three simple steps: press the button, select the destination drive, and press the Apply button. When you shut down Linutop it by default saves only the user settings. So if you install an application and then reboot Linutop, the system will return to its original state. This may sound like a nuisance , but this feature can be useful in situations where you don’t want other users to mess with the system. But what if you want to install additional applications? Select the full persistent system option in the Data persistence subsection, and Linutop will from now on save all your settings and applications. The Remote access subsection lets you easily enable and configure the remote access service, so you can connect to your Linutop and control it from another machine on the network or via the Internet. Press the Configure the remote access service button, and tick the Automatically start the server check box, so that the service starts automatically when you turn Linutop on. If you want to protect Linutop from unauthorized access (which is a very good idea), tick the Request a password check box and specify the desired password. To let users view the Linutop desktop but not control it, tick the Connected users can only view the desktop check box. Finally, tick the Allow multiple connections check box if you want to allow more than one user to access Linutop. Press the Start button, and you can then access Linutop remotely. You can use Linutop not only as a desktop machine, but also as a server. Install, for example, Samba software on it, plug in an external USB hard disk, and you can use Linutop as a nifty file server. In this case, Linutop doesn’t need the full graphical desktop environment, and you can disable it by ticking the Don’t start Xorg check box in the Misc subsection.
If you plan to use Linutop as a public terminal, the Security section allows you to lock the machine, so no one can modify the system (except the administrator, of course). To do this, simply tick the Use the Linutop lock check box, and specify the desired administrator password. Thanks to the Linutop Setup applet, configuring your Linutop machine is a pretty straightforward process that doesn’t require a lot of time or particular Linux skills.
Being small and silent, Linutop makes a perfect server machine. But installing all the desired server packages such as Apache, MySQL, and ProFTPD manually and then tweaking their settings requires both skills and time. There is, however, a better way to turn your Linutop into a LAMPP (Linux+Apache+MySQL+PHP+Perl) server: the XAMPP solution comes with pretty much everything you need as a single neat package. Better yet, you can install and configure XAMPP in a matter of minutes.
To install XAMPP, download the latest .tar.gz archive from the project’s Web site. Use then the following command to unpack the archive and copy all the components to the /opt directory:
sudo tar xvfz xampp-linux-1.7.tar.gz -C /opt
That’s pretty much it. You can then start all the servers using the sudo /opt/lampp/lampp start command. To make sure that everything works as it’s supposed to, point your browser to http://localhost and you should see XAMPP’s default page. Read the rest of this entry »
You may be forgiven for thinking that tweaking your Linux desktop requires some arcane command line skills. Any Linux distro with a graphical desktop environment provides a central place for all graphical tools which you can use to customize your desktop. Case in point: Linutop OS — the customized version of Ubuntu that powers your Linutop machine. Linutop OS uses the lightweight Xfce graphical desktop environment which you can tweak to your liking using the Xfce Settings Manager. It contains configuration applets that let you modify specific aspects of the desktop. To launch the Xfce Settings Manager, choose Settings -> Settings Manager from the Applications menu. Let’s take a look at what the Xfce Settings Manager has to offer.
Autostarted apps This applet allows you to specify applications that start automatically on boot. Adding an application to the list is easy. Click on the Autostarted apps applet and press the Add button. Provide a name and short description of the new entry in the appropriate fields, then specify the command in the Command fields. For example, if you want to start the Gwibber microblogging client (provided it’s installed on your system), enter the gwibber command. Press OK to save the entry, and you should see the created entry in the list of autostarted applications.
Paris, January 1st, 2009 (Never too late)
Happy New Year
Feliz Año Nuevo
Ein Gutes Neues
Jahr
Bonne Année
Onnellista
Uutta Vuotta
ukkig Nieuwjaar
Gott nytt år
Felice anno nuovo
Godt nytår So,
Linutop meets the specification of green computer :
Power Saving:
Linutop implements the latest computer power saving technologies.
With less than 8 watts of power consumption it is one of the most energy efficient on the market.
Sustainable development:
The Linutop life cycle is increased and its maintenance cost is reduced because no mobile parts nor weak components are used inside.
Hence the waste generated is limited.
Its small size makes it easier to recycle and its light weight (580gr) (20 oz) reduces the environmental cost of shipping.
Linutop was awarded the TIC21 price for sustainable innovation 2007

 Linutop OS 3.0 is small, secure, powerful and maintenance free:


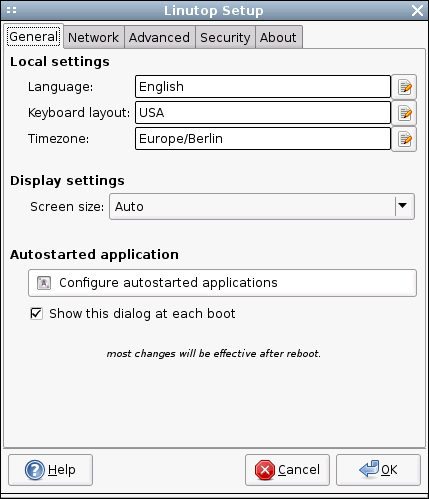 The Linutop Setup applet’s window is divided into four main sections: General, Network, Advanced, and Security. Besides the Language, Keyboard, and Time zone settings, you can use the General section to configure display settings. Usually, Linutop does a good job of detecting the correct display size and resolution. But if it has problems detecting the display’s properties correctly, you can select the appropriate item from the Display size drop-down list. The General section also allows you to configure autostart options, which can be useful in many situations. For example, you can configure Linutop to bypass the full graphical desktop environment and launch only a specified URL in the default Web browser. This can come in particularly handy if you want to use Linutop as a simple Web station. To do this, press the Configure autostarted applications button, select Web Page from the Select an item drop-down list, and tick the Start only this application check button. Tick then the Start with this URL or file check box and enter the desired URL.
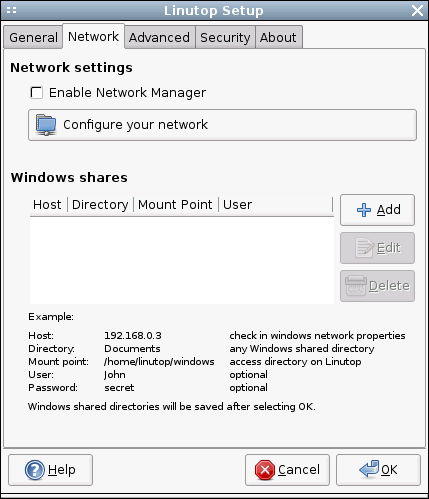 As you might have guessed, the Network section lets you configure wireless and wired interfaces as well as a modem connection. If you are using the built-in Ethernet connection, Linutop does all the donkey work for you. However, if you still need to tweak some settings (e.g., define a static IP address instead of the default DHCP option), press the Configure your network button, select Ethernet connection, and press Properties. In a similar manner, you can configure a wireless interface. Choose Wireless Connection from the list of available connections, press Properties, and fill out the required fields. If you are using Linutop in a mixed environment and you want to access documents and files stored on a Windows machine, you can use the Windows shares subsection to easily add shared folders. Simply press the Add button and type the IP address of the Windows machine in the Host field. Enter then the user name and password required for accessing the Windows share and press OK.
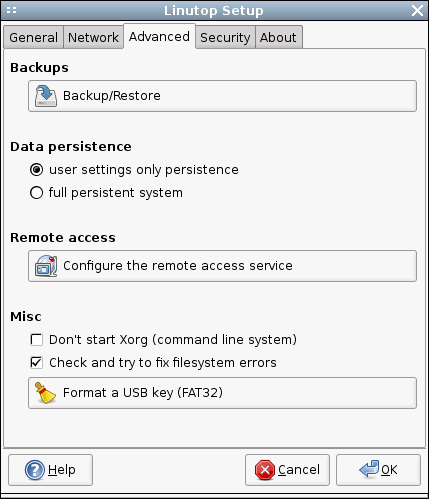 The Advanced section sports a couple of rather useful features. As the name suggests, the Backup/Restore button allows you to back up and restore the entire system in just three simple steps: press the button, select the destination drive, and press the Apply button. When you shut down Linutop it by default saves only the user settings. So if you install an application and then reboot Linutop, the system will return to its original state. This may sound like a nuisance , but this feature can be useful in situations where you don’t want other users to mess with the system. But what if you want to install additional applications? Select the full persistent system option in the Data persistence subsection, and Linutop will from now on save all your settings and applications. The Remote access subsection lets you easily enable and configure the remote access service, so you can connect to your Linutop and control it from another machine on the network or via the Internet. Press the Configure the remote access service button, and tick the Automatically start the server check box, so that the service starts automatically when you turn Linutop on. If you want to protect Linutop from unauthorized access (which is a very good idea), tick the Request a password check box and specify the desired password. To let users view the Linutop desktop but not control it, tick the Connected users can only view the desktop check box. Finally, tick the Allow multiple connections check box if you want to allow more than one user to access Linutop. Press the Start button, and you can then access Linutop remotely. You can use Linutop not only as a desktop machine, but also as a server. Install, for example, Samba software on it, plug in an external USB hard disk, and you can use Linutop as a nifty file server. In this case, Linutop doesn’t need the full graphical desktop environment, and you can disable it by ticking the Don’t start Xorg check box in the Misc subsection.